Design Details
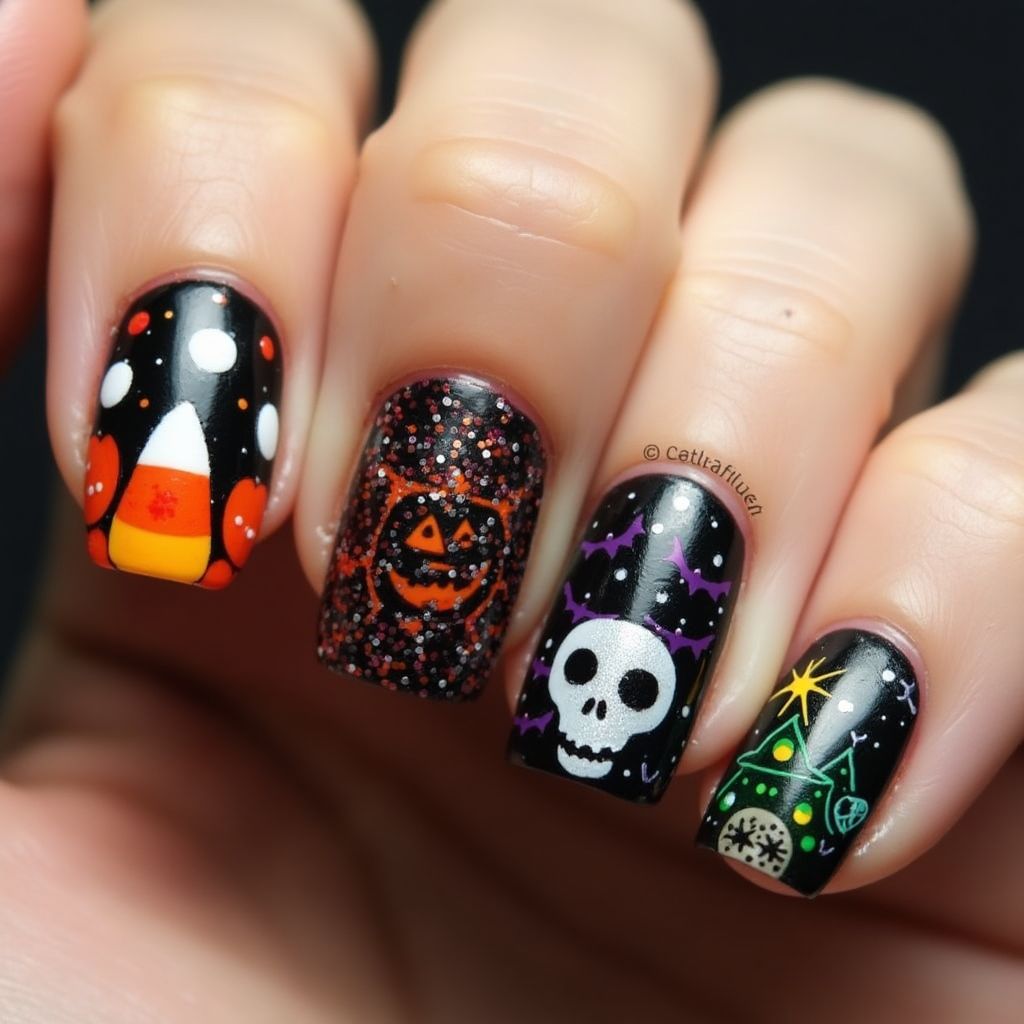
- 1This Halloween-themed nail design features a mix of festive elements like candy corn, a jack-o-lantern, a skull, and a haunted house with a night sky background.
- 2The predominant colors are black, orange, purple, white, green, and yellow, contributing to a spooky and playful vibe.
- 3There's a combination of freehand drawing and glitter to enhance the festive look, with each nail showcasing a unique Halloween element.
- 4The design is detailed and requires precision, suitable for intermediate to advanced skill levels.
Items Needed for this Design
Nail Preparation
- Nail file
- Buffer
- Cuticle pusher
- Base coat
- Top coat
Nail Polish Colors
- Black
- Orange
- White
- Yellow
- Purple
- Green
- Clear glitter polish
Nail Art Tools
- Thin nail art brush
- Dotting tool
- Nail tape (optional)
Cleanup
- Nail polish remover
- Cotton swabs
Step by Step DIY(Do It Yourself) Guide
1
Prepare your nails.
- Shape your nails with a nail file and smooth the surface with a buffer.
- Push back cuticles gently using a cuticle pusher.
- Apply a thin layer of base coat to each nail and let it dry completely.
2
Apply the base color.
- Paint all nails with two coats of black nail polish.
- Ensure each coat dries before applying the next.
3
Create the candy corn design.
- On one nail, use the thin brush to paint a candy corn shape with white, orange, and yellow.
- Add white polka dots around it using a dotting tool.
4
Design the jack-o-lantern.
- On another nail, apply a layer of clear glitter polish.
- Draw an orange jack-o-lantern with a thin brush over the glitter.
5
Draw the skull.
- Using white polish, paint a skull on a black base by outlining it with a thin brush.
- Add details like eyes and mouth with black polish.
6
Paint the haunted house and stars.
- On the last nail, use purple, green, and yellow to draw a haunted house and stars.
- Detail the haunted house with a thin brush for windows and roof.
7
Seal the design.
- Once all designs are dry, apply a clear top coat for shine and protection.
8
Clean up.
- Use a cotton swab dipped in nail polish remover to clean up any stray polish around the cuticles.
Pro Tips
For more precise designs, use a thin nail art brush with a steady hand.
Allow each layer of polish to dry completely to avoid smudging the design.
Use nail tape or stencils if you're not confident in freehand painting.
Always finish with a top coat to extend the longevity of your design.