Design Details
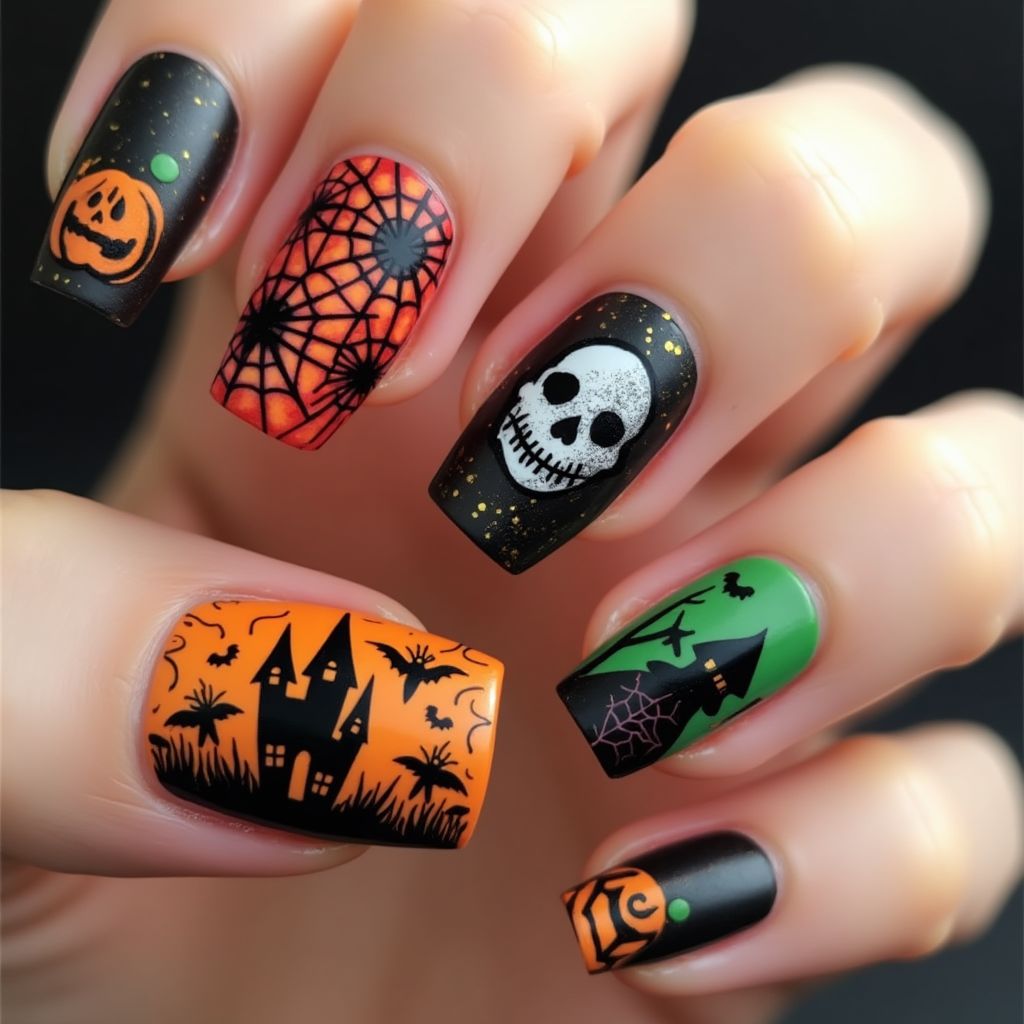
- 1The nail design features a Halloween theme with distinct motifs on each nail, including jack-o'-lanterns, spider webs, skulls, haunted houses, and bats.
- 2A variety of vibrant colors are used, such as orange, black, and green, creating a festive and spooky look.
- 3The design includes intricate detailing with careful use of lines and patterns to accentuate the Halloween theme.
- 4The nails have a mix of matte and glossy finishes, adding depth and contrast to the overall design.
Items Needed for this Design
Nail Preparation
- Nail file
- Cuticle pusher
- Base coat
- Top coat
Nail Polish Colors
- Black nail polish
- Orange nail polish
- Green nail polish
- White nail polish
Nail Art Tools
- Thin nail art brushes
- Dotting tool
- Nail art stickers or decals (optional)
Cleanup
- Nail polish remover
- Cotton swabs
- Small brush
Step by Step DIY(Do It Yourself) Guide
1
Prepare your nails.
- File your nails to your desired shape.
- Push back the cuticles gently.
- Apply a base coat to all nails to protect them and ensure the polish adheres well.
2
Apply the base colors.
- Paint two nails with black polish for a base.
- Paint one nail with orange and another with green.
- Let the polish dry completely before moving to the next step.
3
Create the Halloween designs.
- Use a thin nail art brush and white polish to draw a skull on one of the black nails.
- With a thin brush and black polish, create a spider web on the orange nail.
- Draw a jack-o'-lantern face using black polish on the remaining orange nail.
- On the green nail, use a black brush to create a haunted house silhouette with bats.
4
Add finishing details and designs.
- Add small dots or glitter to accentuate the design using a dotting tool.
- Use nail art stickers or decals for intricate details as needed.
5
Seal and clean up.
- Apply a top coat over each nail to seal in the design and give it a lasting finish.
- Clean up any excess polish on the fingers using a small brush dipped in nail polish remover.
Pro Tips
Make sure each layer of polish is fully dry before adding details to prevent smudging.
Using decals or stickers can simplify complex designs and still give a professional look.
Keep a steady hand and use thin brushes for greater control over intricate designs.
Practice drawing the designs on paper before attempting them on your nails.