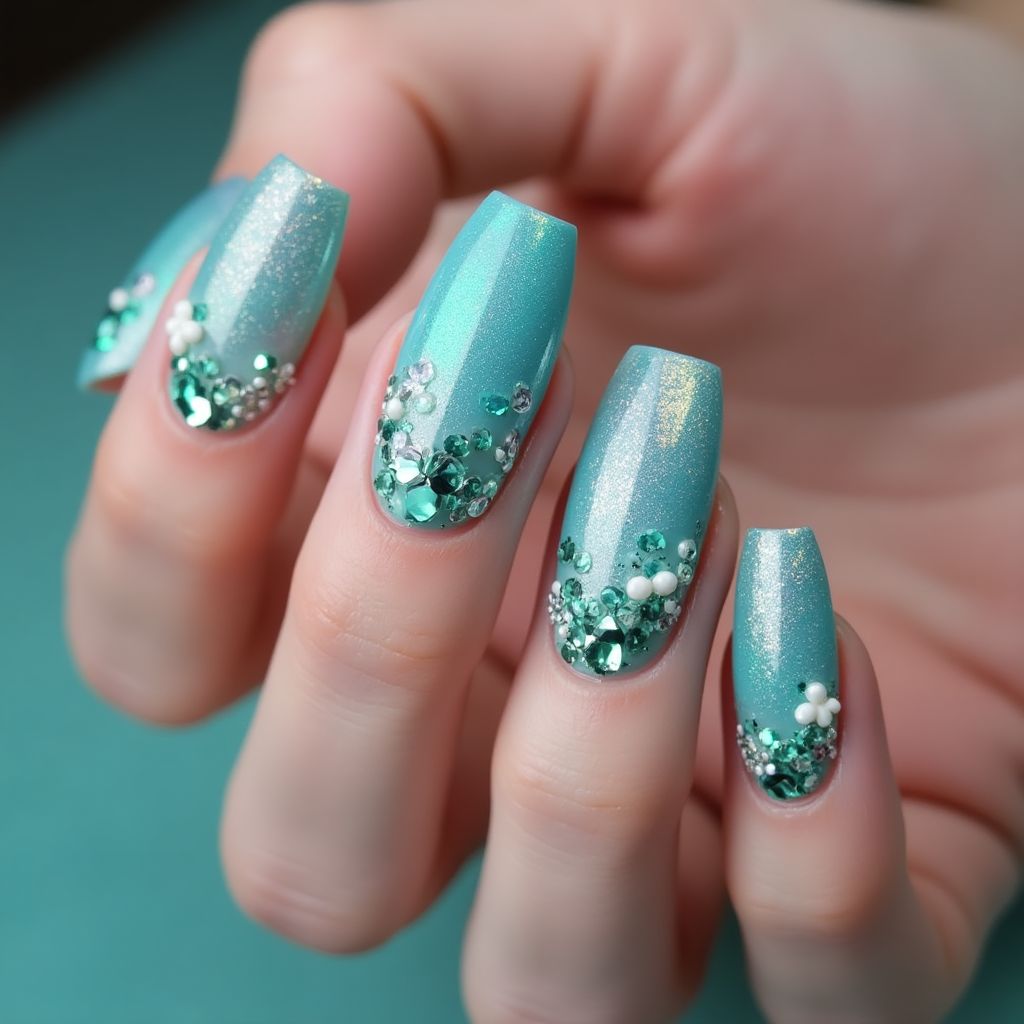
Mermaid Powder Coffin Nail Design
Dive into Dreamy Ocean Vibes with Iridescent Mermaid-Inspired Coffin Nails

Design Details
- 1This nail design features a stunning aqua base with a shimmery finish, providing a vibrant and fresh look.
- 2Embellishments including various sizes of green and clear rhinestones, alongside small white pearls, create a playful and textured effect at the tips.
- 3The design cleverly combines different hues of green for a gradient effect, transitioning from a lighter shade at the cuticle to a deeper tone at the tips.
Items Needed for this Design
Nail Preparation
- Nail file
- Cuticle pusher
- Nail buffer
- Base coat
Nail Polish Colors
- Aqua shimmer nail polish
- Light green nail polish
Nail Art Tools
- Rhinestones in varying sizes
- Small white pearls
- Nail brush or dotting tool
- Top coat
Cleanup
- Acetone or nail polish remover
- Cotton pads
Step by Step DIY(Do It Yourself) Guide
1
Prepare your nails.
- File your nails to your desired shape.
- Gently push back cuticles and buff the nail surface.
- Apply a base coat to protect your natural nails.
2
Apply the base color.
- Apply the aqua shimmer nail polish as the base color.
- Let it dry completely before proceeding.
3
Create the gradient effect.
- Using the light green nail polish, apply it on the tips of the nails.
- Blend it carefully into the aqua base for a smooth transition.
- Allow the gradient to dry.
4
Apply the embellishments.
- Use a dotting tool or nail brush to apply a small amount of top coat to the area where the rhinestones and pearls will be placed.
- Carefully place the rhinestones and pearls onto the wet top coat, arranging them as desired.
- Press lightly to secure them in place.
5
Seal the design.
- Once the embellishments have been positioned, apply a generous layer of top coat to seal everything.
- Ensure the top coat covers the rhinestones for added longevity.
- Allow your nails to dry completely.
Pro Tips
Use a quick-dry top coat to speed up drying time.
If you're unsure about placing rhinestones, practice the design on a nail wheel beforehand.
Ensure to use a gentle touch when applying the embellishments to prevent them from moving out of place.