Design Details
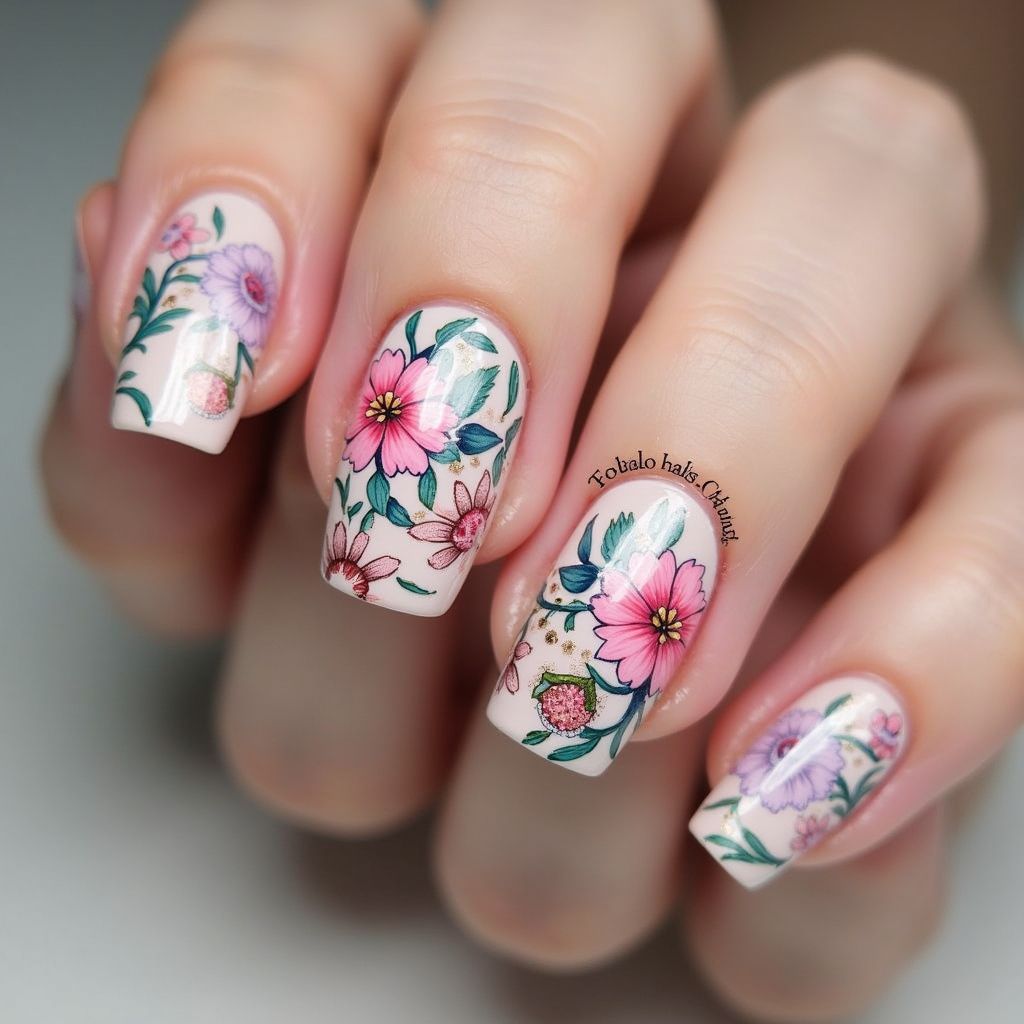
- 1This nail design features a delicate floral pattern on a light nude or pastel pink base.
- 2The flowers are detailed with outlines in black or a dark color, with shades of pink and purple, accompanied by green leaves.
- 3Subtle gold accents are interspersed throughout the design, adding a touch of elegance.
- 4The overall look is feminine and sophisticated, suitable for spring or summer.
Items Needed for this Design
Nail Preparation
- Nail file
- Cuticle pusher
- Nail buffer
- Base coat
Nail Polish Colors
- Light nude or pastel pink nail polish (base color)
- Pink nail polish (various shades for flowers)
- Purple nail polish (various shades for flowers)
- Green nail polish (for leaves)
- Black or dark brown nail polish (for outlines)
- Gold nail polish (for accents)
Nail Art Tools
- Thin nail art brush
- Dotting tool or toothpick
- Nail art stamper and scraper (optional, for floral stamping if preferred)
- Palette or surface for mixing colors
Cleanup
- Nail polish remover
- Small brush or cotton swabs
- Top coat
Step by Step DIY(Do It Yourself) Guide
1
Prepare Your Nails
- File your nails to your desired shape and length.
- Gently push back your cuticles and buff the nail surface.
- Clean your nails with nail polish remover to remove any oils.
- Apply a thin layer of base coat and let it dry completely.
2
Apply Base Color
- Apply 2-3 thin coats of light nude or pastel pink nail polish to all nails, allowing each coat to dry fully before applying the next.
3
Create Floral Outlines
- Using a thin nail art brush and black or dark brown nail polish, paint the outlines of flowers and leaves.
- You can either freehand the designs or use a nail art stamper if you have floral stamping plates.
4
Fill in the Flowers and Leaves
- Using different shades of pink and purple, carefully fill in the flower outlines with color.
- Use a fine nail art brush or dotting tool for precision.
- Fill in the leaves with green nail polish, using different shades if desired.
5
Add Gold Accents
- With a thin nail art brush or dotting tool, add small gold dots or lines around the flowers and leaves for subtle accents.
6
Clean Up
- Dip a small brush or cotton swab in nail polish remover and carefully clean up any mistakes or polish on the skin around your nails.
7
Apply Top Coat
- Once the design is completely dry, apply a generous layer of top coat to seal the design and add shine.
- Allow the top coat to dry fully.
Pro Tips
For beginners, consider using nail art stickers or stamps to achieve the floral design if freehand painting is difficult.
Use a light hand when applying the base color to avoid streaks and ensure even coverage.
Clean your nail art brushes frequently with nail polish remover to prevent the polish from drying and ruining the bristles.
Allow each layer of polish to dry completely before adding the next to prevent smudging and ensure a smooth finish.
Consider using quick-drying top coat to reduce the drying time and protect your design from chipping.