Design Details
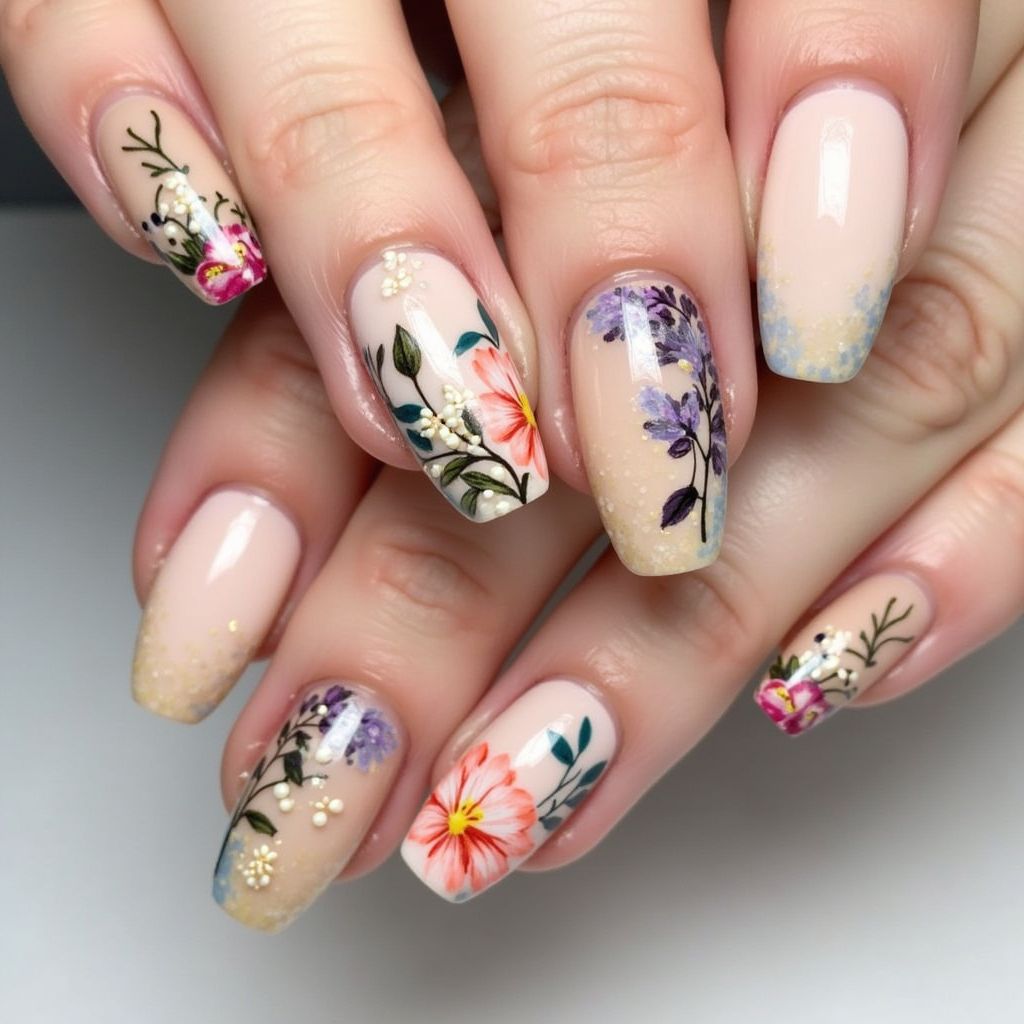
- 1This nail design features a delicate floral theme with each nail showcasing unique floral arrangements.
- 2The color palette is soft and natural, with a nude base complemented by floral elements in shades of pink, purple, green, and white.
- 3Some nails have a subtle glitter fade at the tips, adding a touch of sparkle, while others incorporate 3D white embellishments to enhance the floral details.
- 4The overall look is feminine, elegant, and suitable for various occasions, blending artistic details with a natural aesthetic.
Items Needed for this Design
Nail Preparation
- Nail file
- Cuticle pusher
- Cuticle nipper
- Nail buffer
- Lint-free wipes
- Nail cleanser
Nail Polish Colors
- Nude nail polish (base color)
- White nail polish
- Pink nail polish
- Purple nail polish
- Green nail polish
- Yellow nail polish
- Fine glitter nail polish (gold or silver)
- Black nail polish
Nail Art Tools
- Fine detail brushes
- Dotting tool
- Small sponge or makeup sponge
- Tweezers (for applying embellishments)
Cleanup
- Nail polish remover
- Small cleanup brush
- Top coat (glossy or matte)
- 3D white embellishments (small pearls or acrylic dots)
Step by Step DIY(Do It Yourself) Guide
1
Prepare the Nails
- File and shape your nails to the desired shape (almond or oval as seen in the image).
- Gently push back the cuticles and trim any excess cuticle skin.
- Buff the surface of your nails to create a smooth base.
- Cleanse your nails with a lint-free wipe and nail cleanser to remove any oils or debris.
2
Apply Base Color
- Apply a thin, even coat of nude nail polish to all nails.
- Allow the first coat to dry completely before applying a second coat for full coverage.
- Let the second coat dry thoroughly.
3
Create Glitter Fade (select nails)
- Apply a thin layer of fine glitter nail polish to the tips of select nails.
- Use a small sponge to gently dab the glitter upwards, creating a faded effect.
- Allow the glitter to dry completely.
4
Paint Floral Designs
- Use a fine detail brush to paint floral designs on the nails.
- Start with the larger flowers using pink and purple nail polish.
- Add green leaves and stems using a thin brush and green nail polish.
- Incorporate white details and small dots using a dotting tool and white nail polish.
- Use black nail polish to outline the flowers and leaves.
5
Add 3D Embellishments (select nails)
- Apply a small dot of clear nail glue or top coat where you want to place the embellishments.
- Use tweezers to carefully pick up and place the 3D white embellishments onto the nail.
- Press gently to secure the embellishments in place.
- Allow the glue to dry completely.
6
Clean Up Edges
- Dip a small cleanup brush into nail polish remover.
- Carefully clean up any polish around the edges of the nails.
- Ensure the lines are clean and crisp.
7
Apply Top Coat
- Apply a generous coat of top coat (glossy or matte) to seal the design and add shine.
- Ensure the top coat covers all the design elements, including the embellishments.
- Allow the top coat to dry completely.
Pro Tips
Practice the floral designs on a piece of paper before applying them to your nails.
Use thin coats of nail polish to prevent smudging and allow for better control when painting details.
Clean your brushes frequently during the painting process to prevent color mixing and maintain precision.
Allow each layer of polish to dry completely before applying the next to avoid smearing.
If you are not comfortable with freehand painting, consider using nail art stickers or stencils for the floral designs.
Apply cuticle oil daily to keep your cuticles hydrated and healthy.