Design Details
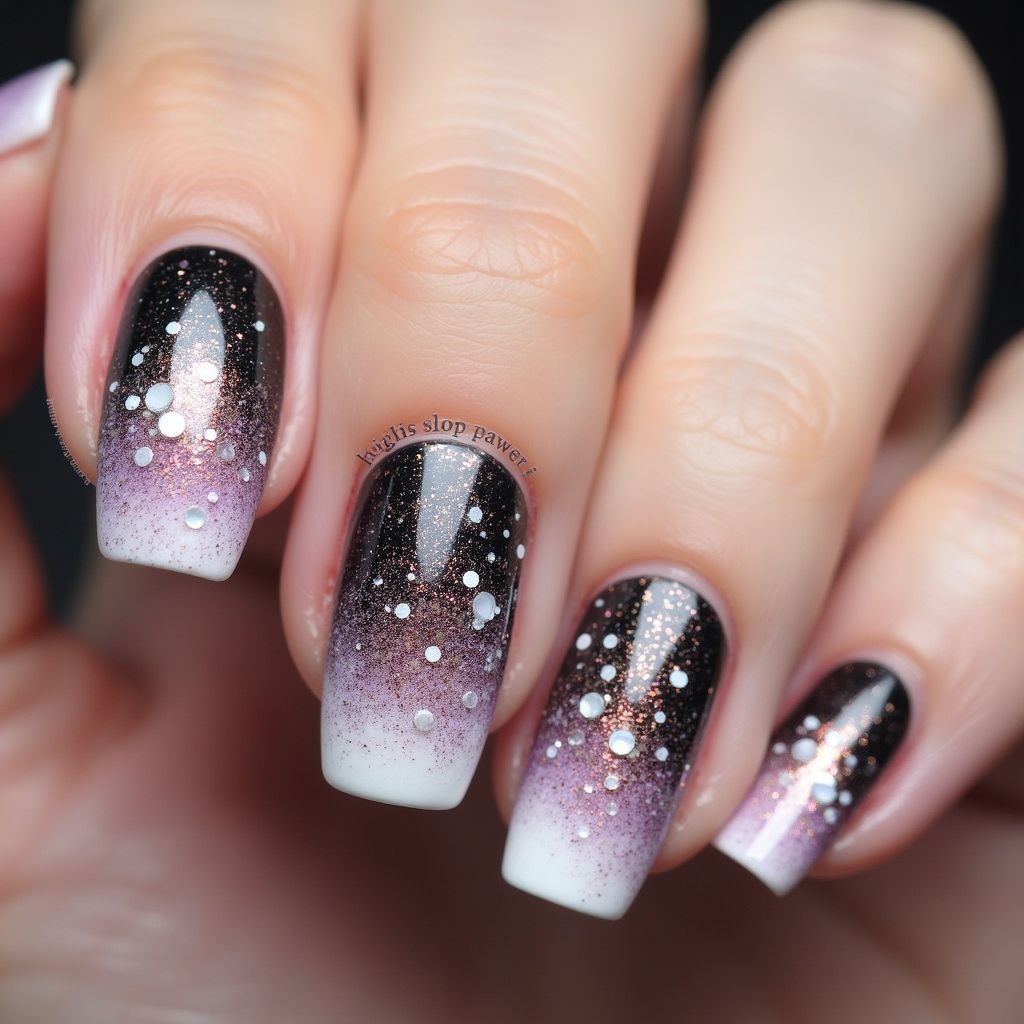
- 1This nail art design features a captivating color gradient, transitioning from white at the base to a shimmering purple and culminating in a deep black at the tip.
- 2The design is further enhanced by a layer of rose gold glitter, adding a touch of elegance and sparkle.
- 3White dots of varying sizes are scattered across the nails, mimicking the appearance of snowfall or stars in the night sky, creating a whimsical and festive effect.
- 4The overall look is sophisticated and eye-catching, suitable for both casual and special occasions.
Items Needed for this Design
Nail Preparation
- Nail file
- Cuticle pusher
- Buffer
- Base coat
Nail Polish Colors
- White nail polish
- Shimmering purple nail polish
- Black nail polish
- Rose gold glitter polish
- Clear top coat
Nail Art Tools
- Makeup sponge or blending sponge
- Dotting tool or toothpick
Cleanup
- Nail polish remover
- Small brush or cotton swabs
Step by Step DIY(Do It Yourself) Guide
1
Prepare Your Nails
- File and shape your nails to your desired shape.
- Gently push back your cuticles and buff the nail surface for a smooth base.
- Apply a thin layer of base coat to protect your natural nails and allow it to dry completely.
2
Create the Gradient Base
- Apply white nail polish to the lower portion of your nail.
- Using a makeup sponge, apply shimmering purple nail polish, blending it upwards to cover the middle section of the nail.
- On the same sponge or a new one, apply black nail polish to the tip of the nail, blending it slightly with the purple to create a seamless transition. You may need multiple layers for the desired opacity.
3
Add Rose Gold Glitter
- Apply a thin layer of rose gold glitter polish over the gradient, concentrating it more towards the purple and black areas to enhance the sparkle.
- Allow the glitter polish to dry thoroughly.
4
Create the Dot Details
- Using a dotting tool or toothpick, create various sizes of white dots randomly across the nail surface.
- Start with larger dots near the white base and gradually decrease the size as you move towards the black tip for a more natural look.
- Let the dots dry completely to avoid smudging.
5
Seal and Finish
- Apply a generous layer of clear top coat to seal in the design and add shine.
- Allow the top coat to dry completely.
- Clean up any excess polish around the edges of your nails using a small brush or cotton swab dipped in nail polish remover.
Pro Tips
For a smoother gradient, apply thin layers of each color and blend well.
Use a clean sponge for each color to prevent mixing and maintain color vibrancy.
Practice dotting on a piece of paper before applying to your nails to get the right size and distribution.
Allow each layer of polish to dry completely before applying the next to avoid smudging and ensure a long-lasting design.
Consider using quick-drying top coat to speed up the drying process and prevent accidental smudges.
If you don't have rose gold glitter polish, you can mix fine rose gold glitter with a clear top coat.